Connect from Drizzle to Neon
How to connect from Drizzle using different drivers How to configure Drizzle Kit for migrations Drizzle with Neon Postgres (Drizzle Docs) Schema migration with Drizzle ORM Getting started with Neon (N...
Pre-built prompt for connecting Node/TypeScript applications to Neon using Drizzle ORM.
What you will learn:
Section titled “What you will learn:”- How to connect from Drizzle using different drivers
- How to configure Drizzle Kit for migrations
Related resources
Section titled “Related resources”- Drizzle with Neon Postgres (Drizzle Docs)
- Schema migration with Drizzle ORM
- Getting started with Neon (Next.js and Drizzle video)
Drizzle is a modern ORM for TypeScript that provides a simple and type-safe way to interact with your database. This guide demonstrates how to connect your application to a Lakebase Postgres database using Drizzle ORM.
To connect a TypeScript/Node.js project to Neon using Drizzle ORM, follow these steps:
Create a TypeScript/Node.js project
Create a new directory for your project and navigate into it:
Bash mkdir my-drizzle-neon-project cd my-drizzle-neon-projectInitialize a new Node.js project with a
package.jsonfile:Bash npm init -yCreate a Neon project
If you do not have one already, create a Neon project.
- Navigate to the Projects page in the Neon Console.
- Click New Project.
- Specify your project settings and click Create Project.
Get your connection string
Find your database connection string by clicking the Connect button in the Console nav to open the Connect to your branch modal. Select a branch, a user, and the database you want to connect to. A connection string is constructed for you.
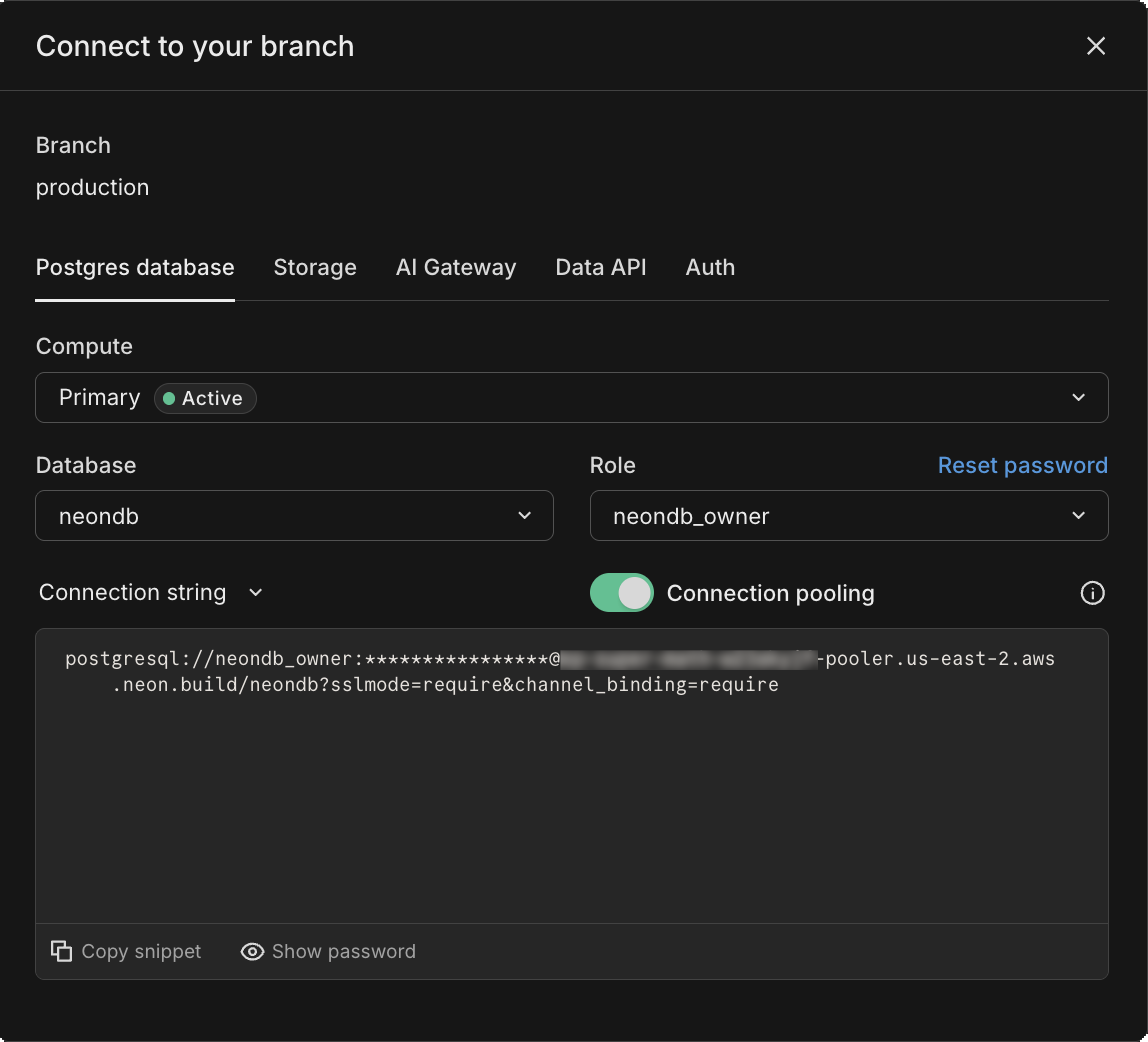 The connection string includes the user name, password, hostname, and database name.
Create a
.envfile in your project's root directory and add the connection string to it. Your.envfile should look like this:# Pooled connection for your application DATABASE_URL="postgresql://[user]:[password]@[endpoint]-pooler.[region].aws.neon.tech/[dbname]?sslmode=require" # Unpooled connection for Drizzle Kit DATABASE_URL_UNPOOLED="postgresql://[user]:[password]@[endpoint].[region].aws.neon.tech/[dbname]?sslmode=require"Install Drizzle and a driver
Install Drizzle ORM, Drizzle Kit for migrations, and your preferred database driver. Choose one of the following drivers based on your application's needs:
Use the Neon serverless HTTP driver for serverless environments (for example, Vercel, Netlify).
Bash npm install drizzle-orm @neondatabase/serverless dotenv npm install -D drizzle-kitUse the Neon WebSocket driver for long-running applications that require a persistent connection (for example, a standard Node.js server).
Bash npm install drizzle-orm @neondatabase/serverless ws dotenv npm install -D drizzle-kit @types/wsUse the classic
node-postgres(pg) driver, a widely-used and stable choice for Node.js applications.Bash npm install drizzle-orm pg dotenv npm install -D drizzle-kit @types/pgUse the
postgres.jsdriver, a modern and lightweight Postgres client for Node.js.Bash npm install drizzle-orm postgres dotenv npm install -D drizzle-kitConfigure Drizzle Kit
Drizzle Kit uses a configuration file to manage schema and migrations. Create a
drizzle.config.tsfile in your project root and add the following content. This configuration tells Drizzle where to find your schema and where to output migration files.TypeScript import 'dotenv/config'; import { defineConfig } from 'drizzle-kit'; if (!process.env.DATABASE_URL_UNPOOLED) { throw new Error('DATABASE_URL_UNPOOLED is not set in the .env file'); } export default defineConfig({ schema: './src/schema.ts', // Your schema file path out: './drizzle', // Your migrations folder dialect: 'postgresql', dbCredentials: { url: process.env.DATABASE_URL_UNPOOLED, }, });Initialize the Drizzle client
Create a file:
src/db.ts, to initialize and export your Drizzle client. The setup varies depending on the driver you installed.Neon Serverless (HTTP) import 'dotenv/config'; import { drizzle } from 'drizzle-orm/neon-http'; import { neon } from '@neondatabase/serverless'; const sql = neon(process.env.DATABASE_URL!); export const db = drizzle(sql);Neon WebSocket import 'dotenv/config'; import { drizzle } from 'drizzle-orm/neon-serverless'; import { Pool, neonConfig } from '@neondatabase/serverless'; import ws from 'ws'; // For Node.js environments older than v22, you must provide a WebSocket constructor neonConfig.webSocketConstructor = ws; // To work in edge environments (Cloudflare Workers, Vercel Edge, etc.), enable querying over fetch // neonConfig.poolQueryViaFetch = true const pool = new Pool({ connectionString: process.env.DATABASE_URL! }); export const db = drizzle(pool);node-postgres import 'dotenv/config'; import { drizzle } from 'drizzle-orm/node-postgres'; import { Pool } from 'pg'; const pool = new Pool({ connectionString: process.env.DATABASE_URL!, }); export const db = drizzle(pool);postgres.js import 'dotenv/config'; import { drizzle } from 'drizzle-orm/postgres-js'; import postgres from 'postgres'; const client = postgres(process.env.DATABASE_URL!); export const db = drizzle(client);Create a schema
Drizzle uses a schema-first approach, allowing you to define your database schema using TypeScript. This schema will be used to generate migrations and ensure type safety throughout your application.
The following example defines a schema for a simple
demo_userstable. Create asrc/schema.tsfile and add the following content:TypeScript import { pgTable, serial, text } from 'drizzle-orm/pg-core'; export const demoUsers = pgTable('demo_users', { id: serial('id').primaryKey(), name: text('name'), });Generate migrations
After defining your schema, you can generate migration files with Drizzle Kit. This will create the necessary SQL files to set up your database schema in Neon.
Bash npx drizzle-kit generateYou should see output similar to the following, indicating that migration files have been created:
Bash $ npx drizzle-kit generate No config path provided, using default 'drizzle.config.ts' Reading config file '/home/user/drizzle/drizzle.config.ts' 1 tables demo_users 2 columns 0 indexes 0 fks [✓] Your SQL migration file ➜ drizzle/0000_clever_purple_man.sql 🚀You can find the generated SQL migration files in the
drizzledirectory specified in yourdrizzle.config.ts.Apply migrations
Apply the generated migrations (SQL files) to your Neon database using Drizzle Kit. This command will use the
drizzle.config.tsfile for database connection details and apply the migrations to your Neon database.Bash npx drizzle-kit migrateYou should see output similar to the following, indicating that the migrations have been applied successfully:
Bash $ npx drizzle-kit migrate No config path provided, using default 'drizzle.config.ts' Reading config file '/home/user/drizzle/drizzle.config.ts' Using 'pg' driver for database queryingYou can verify that the
demo_userstable has been created in your Neon database by checking the Tables section in the Neon Console.Query the database
Create a file:
src/index.ts, to interact with your database using the Drizzle client. Here's an example of inserting a new user and querying all users from thedemo_userstable:TypeScript import { db } from './db'; import { demoUsers } from './schema'; async function main() { try { await db.insert(demoUsers).values({ name: 'John Doe' }); const result = await db.select().from(demoUsers); console.log('Successfully queried the database:', result); } catch (error) { console.error('Error querying the database:', error); } } main();Run the script using
tsx:Bash npx tsx src/index.tsYou should see output similar to the following, indicating that the user was inserted and queried successfully:
Bash Successfully queried the database: [ { id: 1, name: 'John Doe' } ]
Using Neon branches with Drizzle
Section titled “Using Neon branches with Drizzle”You can point Drizzle at different Neon branches per environment by selecting the connection string based on NODE_ENV (or any other environment variable):
import { drizzle } from 'drizzle-orm/neon-http';
import { neon } from '@neondatabase/serverless';

const getBranchUrl = () => {
  const env = process.env.NODE_ENV;
  if (env === 'development') return process.env.DEV_DATABASE_URL;
  if (env === 'test') return process.env.TEST_DATABASE_URL;
  return process.env.DATABASE_URL;
};

const sql = neon(getBranchUrl()!);
export const db = drizzle({ client: sql });
Each branch has its own connection string, available in the Neon Console or via the CLI (neon connection-string <branch-id-or-name> --project-id <project-id>).
Resources
Section titled “Resources”- Get Started with Drizzle and Neon
- Drizzle with Neon Postgres
- Schema migration with Lakebase Postgres and Drizzle ORM
- Todo App with Neon Postgres and Drizzle ORM
Next steps
Section titled “Next steps”- Set up Managed Better Auth: Add managed authentication that branches with your database
- Add Object Storage: S3-compatible file storage that branches with your database
- Deploy a Function: Run backend compute next to your database, no separate hosting needed
- Call an LLM with AI Gateway: Access foundation models from Anthropic, OpenAI, Google, and more with one credential
Need help?
Section titled “Need help?”Join our Discord Server to ask questions or see what others are doing with Neon. For paid plan support options, see Support.