This guide describes how to create a Neon project and connect to it from a Java application using Java Database Connectivity (JDBC), the standard API for interacting with relational databases in Lakeb...
Pre-built prompt for connecting Java applications to Neon
This guide describes how to create a Neon project and connect to it from a Java application using Java Database Connectivity (JDBC), the standard API for interacting with relational databases in Lakebase Postgres.
You will learn how to set up a project, connect to your database, and perform basic create, read, update, and delete (CRUD) operations.
Specify your project settings and click Create Project.
Your project is created with a ready-to-use database named neondb. In the following steps, you will connect to this database from your Java application.
Create a Java project
Create a project using the Maven archetype:generate command. This sets up a standard Java project structure.
Run the following command in your terminal to generate a new Maven project. This command creates a simple Java project with the maven-archetype-quickstart archetype.Bash
Change into the newly created project directory.Bash
cd neon-java-jdbc
Open this directory in your preferred code editor (for example, VS Code, IntelliJ IDEA).
Add the postgresql driver and dotenv-java libraries as dependencies in your pom.xml file. There may be other dependencies already present (e.g, junit), so ensure you add these within the <dependencies> section.xml
Make sure to add this to the <dependencies> section. A common mistake is adding it to <dependencyManagement>, which only declares a version but doesn't actually include the library in your build.
Save the file.
Compile the project to download the dependencies.Bash
mvn clean compile
This command compiles your Java code and downloads the required dependencies specified in pom.xml.
Store your Neon connection string
Create a file named .env in your project's root directory. This file will securely store your database connection string.
In the Neon Console, select your project on the Dashboard.
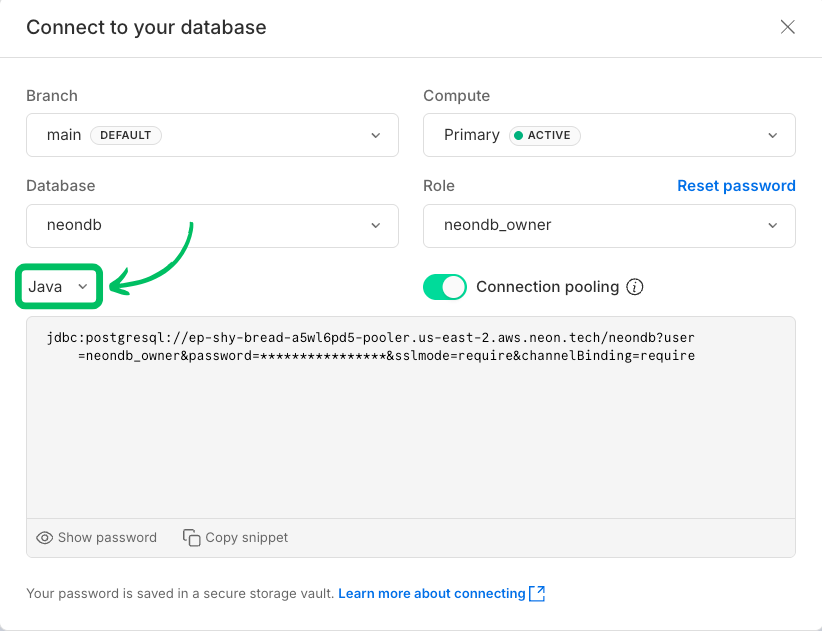
Click Connect in the Console nav to open the Connect to your branch modal.
Select Java as your programming language.
Copy the connection string, which includes your password.
Create a file named .env in your project's root directory and add the connection string to it as shown below:
When the read logic runs, it produces the following output:
Connection established

--- Book Library ---
ID: 2, Title: The Hobbit, Author: J.R.R. Tolkien, Year: 1937, In Stock: true
ID: 3, Title: 1984, Author: George Orwell, Year: 1949, In Stock: true
ID: 1, Title: The Catcher in the Rye, Author: J.D. Salinger, Year: 1951, In Stock: true
ID: 4, Title: Dune, Author: Frank Herbert, Year: 1965, In Stock: false
--------------------
Update data
Create a file named UpdateData.java to update the stock status of 'Dune' to True.
--- Book Library ---
ID: 2, Title: The Hobbit, Author: J.R.R. Tolkien, Year: 1937, In Stock: true
ID: 1, Title: The Catcher in the Rye, Author: J.D. Salinger, Year: 1951, In Stock: true
ID: 4, Title: Dune, Author: Frank Herbert, Year: 1965, In Stock: true
--------------------
You can see that the book '1984' has been successfully deleted from the books table.
Using transactions
The examples above execute each operation independently. For production code where multiple operations must succeed or fail together, wrap them in a transaction. Use setAutoCommit(false) to start a transaction, commit() on success, and rollback() in the catch block on failure.
Always use PreparedStatement (with ? placeholders) for INSERT, UPDATE, and DELETE operations. Do not use Statement for queries with user-provided data, as this is vulnerable to SQL injection.
Add dependencies to the <dependencies> section of pom.xml, not <dependencyManagement>. The <dependencyManagement> section declares versions but does not include libraries in the build.
Wrap related database operations in a transaction (setAutoCommit(false) / commit() / rollback()). Always call rollback() in a catch block to ensure atomicity on failure.
Close JDBC connections and statements using try-with-resources or explicit finally blocks to prevent connection leaks.
Do not hardcode credentials in .java files. Use environment variables via dotenv-java. For more information, see Security overview.
While this guide demonstrates how to connect to Neon using raw SQL queries, for more advanced and maintainable data interactions in your Java applications, consider using an Object-Relational Mapping (ORM) framework. ORMs not only let you work with data as objects but also help manage schema changes through automated migrations keeping your database structure in sync with your application models.
Explore the following resources to learn how to integrate ORMs with Neon: