Media storage with Uploadcare
Uploadcare provides a cloud platform designed to simplify file uploading, processing, storage, and delivery via a fast CDN. It offers tools that manage and optimize media like images, videos, and docu...
Uploadcare provides a cloud platform designed to simplify file uploading, processing, storage, and delivery via a fast CDN. It offers tools that manage and optimize media like images, videos, and documents for your applications.
Neon now offers native storage
Neon Object Storage is S3-compatible object storage built into the Neon backend. Object storage branches with your database: each branch gets its own isolated namespace, so you can test file uploads in preview branches without touching production. No separate cloud account needed. Use any S3-compatible SDK with your existing Neon credential.
For more information, see Neon Object Storage.
This guide demonstrates how to integrate Uploadcare with Lakebase Postgres by storing file metadata in your Lakebase Postgres database while using Uploadcare for file uploads and storage.
Setup steps
Section titled “Setup steps”Create a project on Neon
- Navigate to the Neon Console to create a new project.
- Copy the connection string by clicking the Connect button in the Console nav. For more information, see Connect from any application.
Create an Uploadcare account and project
- Sign up for an account at Uploadcare.com.
- Create a new project within your Uploadcare dashboard.
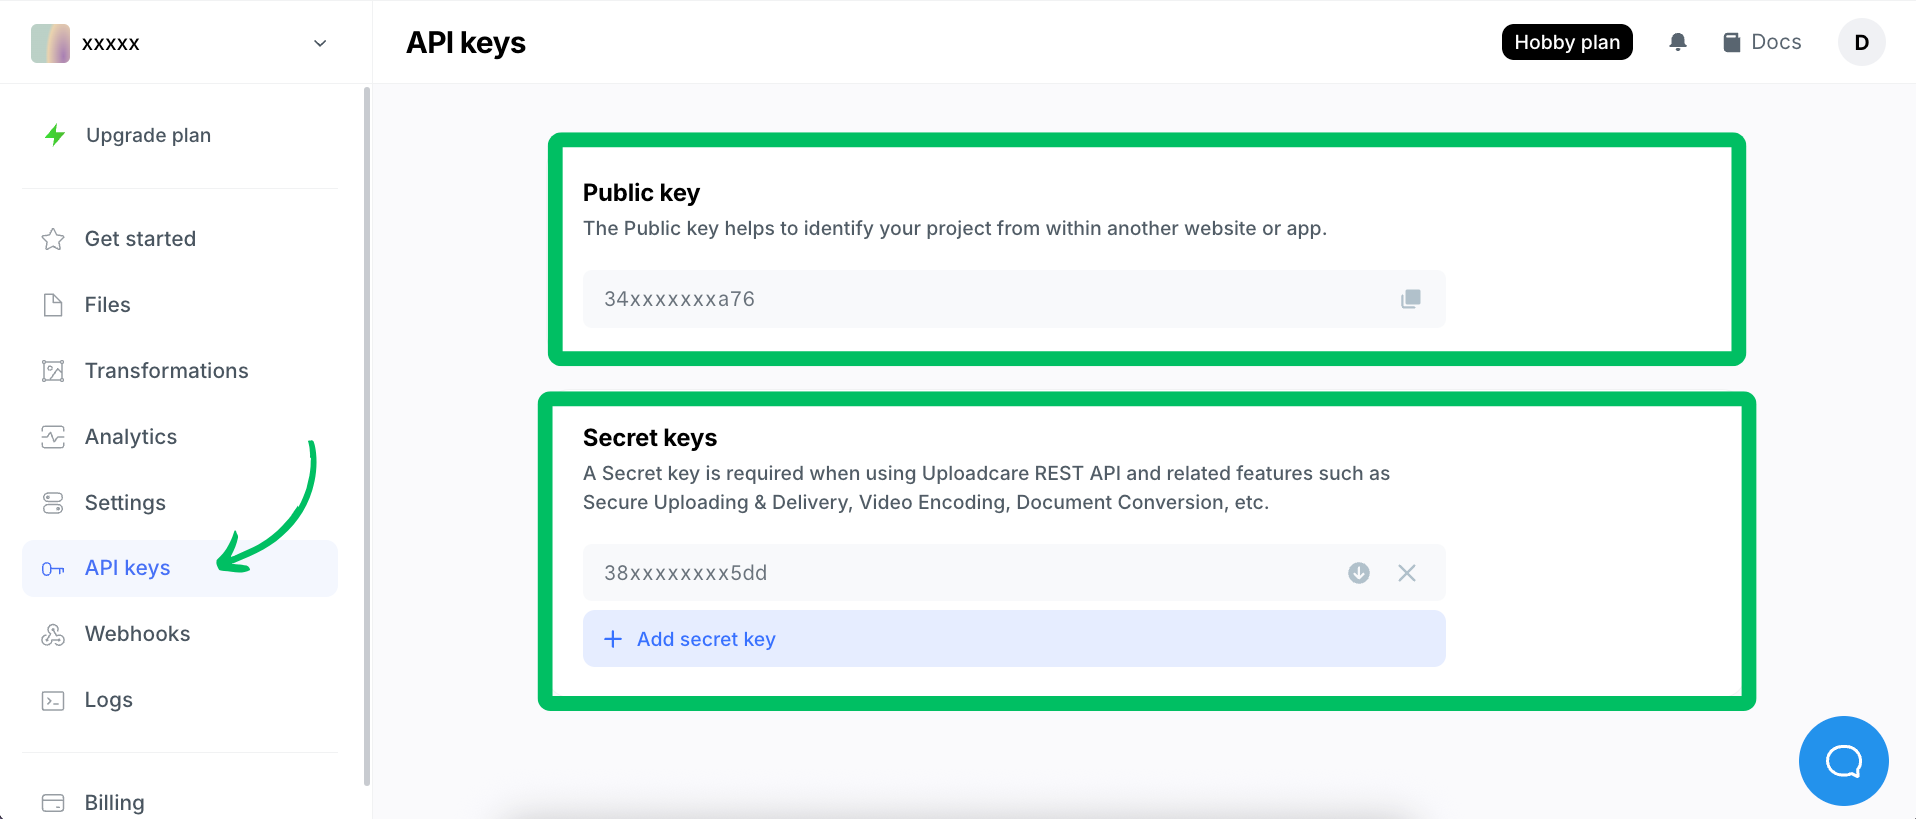
- Navigate to your project's API Keys section.
- Note your Public Key and Secret Key. They are needed to interact with the Uploadcare API and widgets.
Create a table for file metadata
We need to create a table to store metadata about the files uploaded to Uploadcare. This table will include fields for the file's unique identifier, URL, upload timestamp, and any other relevant metadata you want to track.
- You can run the create table statement using the SQL Editor or from a client such as psql that is connected to your database. Here is an example SQL statement to create a simple table for file metadata which includes a file ID, URL, user ID, and upload timestamp:
SQL CREATE TABLE IF NOT EXISTS uploadcare_files ( id SERIAL PRIMARY KEY, file_id TEXT NOT NULL UNIQUE, file_url TEXT NOT NULL, user_id TEXT NOT NULL, upload_timestamp TIMESTAMPTZ DEFAULT NOW() ); - Run the SQL statement. You can add other relevant columns (file size, content type, etc.) depending on your application needs.
- You can run the create table statement using the SQL Editor or from a client such as psql that is connected to your database. Here is an example SQL statement to create a simple table for file metadata which includes a file ID, URL, user ID, and upload timestamp:
Upload files to Uploadcare and store metadata in Neon
You can integrate file uploads using any of Uploadcare's many options, which include UI widgets and SDKs tailored for specific languages and frameworks. For the examples in this guide, we will use the Uploadcare API directly. Feel free to choose the integration method that best fits your project; the fundamental approach of storing metadata in Neon remains the same.
For this example, we'll build a simple Node.js server using Hono to handle file uploads. It will use the
@uploadcare/upload-clientpackage to upload files to Uploadcare and@neondatabase/serverlesspackage to save metadata into your Neon database.First, install the necessary dependencies:
Bash npm install @uploadcare/upload-client @neondatabase/serverless @hono/node-server honoCreate a
.envfile in your project root and add your Uploadcare and Neon connection details which you obtained in the previous steps:Bash UPLOADCARE_PUBLIC_KEY=your_uploadcare_public_key DATABASE_URL=your_neon_database_connection_stringThe following code snippet demonstrates this workflow:
JavaScript import { serve } from '@hono/node-server'; import { Hono } from 'hono'; import { uploadFile } from '@uploadcare/upload-client'; import { neon } from '@neondatabase/serverless'; import 'dotenv/config'; const sql = neon(process.env.DATABASE_URL); const app = new Hono(); // Replace this with your actual user authentication logic, by validating JWTs/Headers, etc. const authMiddleware = async (c, next) => { c.set('userId', 'user_123'); // Example: Get user ID after validation await next(); }; app.post('/upload', authMiddleware, async (c) => { try { // 1. Get User ID and File Data const userId = c.get('userId'); const formData = await c.req.formData(); const file = formData.get('file'); const fileName = formData.get('fileName') || file.name; const buffer = Buffer.from(await file.arrayBuffer()); // 2. Upload to Uploadcare const result = await uploadFile(buffer, { publicKey: process.env.UPLOADCARE_PUBLIC_KEY, fileName: fileName, contentType: file.type, }); // 3. Save Metadata to Neon // Uses file_id (Uploadcare UUID), file_url (CDN URL), and user_id await sql` INSERT INTO uploadcare_files (file_id, file_url, user_id) VALUES (${result.uuid}, ${result.cdnUrl}, ${userId}) `; console.log(`Uploaded ${result.uuid} for user ${userId} to ${result.cdnUrl}`); return c.json({ success: true, fileUrl: result.cdnUrl }); } catch (error) { console.error('Upload Error:', error); return c.json({ success: false, error: 'Upload failed' }, 500); } }); const port = 3000; serve({ fetch: app.fetch, port }, (info) => { console.log(`Server running at http://localhost:${info.port}`); });Explanation
- Setup: It initializes the Neon database client and the Hono web framework. It relies on environment variables (
DATABASE_URL,UPLOADCARE_PUBLIC_KEY) being set, via a.envfile. - Authentication: A placeholder
authMiddlewareis included. Crucially, this needs to be replaced with real authentication logic. It currently just sets a staticuserIdfor demonstration. - Upload Endpoint (
/upload):- It expects a
POSTrequest withmultipart/form-data. - It retrieves the user ID set by the middleware.
- It extracts the
filedata andfileNamefrom the form data. - It uploads the file content directly to Uploadcare.
- Upon successful upload, Uploadcare returns details including a unique
uuidand acdnUrl. - It executes an
INSERTstatement using the Neon serverless driver to save theuuid,cdnUrl, and theuserIdinto auploadcare_filestable in your database. - It sends a JSON response back to the client containing the
fileUrlfrom Uploadcare.
- It expects a
For this example, we'll build a simple Flask server to handle file uploads. It will use the
pyuploadcarepackage to upload files to Uploadcare andpsycopg2to save metadata into your Neon database.First, install the necessary dependencies:
Bash pip install Flask pyuploadcare psycopg2-binary python-dotenvCreate a
.envfile in your project root and add your Uploadcare and Neon connection details which you obtained in the previous steps:env UPLOADCARE_PUBLIC_KEY=your_uploadcare_public_key UPLOADCARE_SECRET_KEY=your_uploadcare_secret_key DATABASE_URL=your_neon_database_connection_stringThe following code snippet demonstrates this workflow:
Python import os import psycopg2 from dotenv import load_dotenv from flask import Flask, jsonify, request from pyuploadcare import Uploadcare load_dotenv() # Use a global PostgreSQL connection instead of creating a new one for each request in production def get_database(): return psycopg2.connect(os.getenv("DATABASE_URL")) # Replace this with your actual user authentication logic, by validating JWTs/Headers, etc. def get_authenticated_user_id(request): return "user_123" # Example: Get user ID after validation uploadcare = Uploadcare( public_key=os.getenv("UPLOADCARE_PUBLIC_KEY"), secret_key=os.getenv("UPLOADCARE_SECRET_KEY"), ) app = Flask(__name__) @app.route("/upload", methods=["POST"]) def upload_file(): try: # 1. Get User ID and File from the request user_id = get_authenticated_user_id(request) file = request.files["file"] if file: # 2. Upload the file to Uploadcare response = uploadcare.upload(file) file_url = response.cdn_url # 3. Save Metadata to Neon # Uses file_id (Uploadcare UUID), file_url (CDN URL), and user_id conn = get_database() cursor = conn.cursor() cursor.execute( "INSERT INTO uploadcare_files (file_id, file_url, user_id) VALUES (%s, %s, %s)", (response.uuid, file_url, user_id), ) conn.commit() cursor.close() conn.close() return jsonify({"success": True, "fileUrl": response.cdn_url}) else: return jsonify({"success": False, "error": "No file provided"}) except Exception as e: print(f"Upload Error: {e}") return jsonify({"success": False, "error": "File upload failed"}), 500 if __name__ == "__main__": app.run(port=3000, debug=True)Explanation
- Setup: Initializes the Flask web framework, Uploadcare client, and the PostgreSQL client (
psycopg2) using environment variables. - Authentication: A placeholder
get_authenticated_user_idfunction is included. Replace this with real authentication logic. - Upload Endpoint (
/upload):- It expects a
POSTrequest withmultipart/form-data. - It retrieves the user ID set by the authentication function.
- It extracts the
filedata from the form data. - It uploads the file content directly to Uploadcare.
- Upon successful upload, Uploadcare returns details including a unique
uuidand acdnUrl. - It executes an
INSERTstatement usingpsycopg2to save theuuid,cdnUrl, and theuserIdinto auploadcare_filestable in your database. - It sends a JSON response back to the client containing the
fileUrlfrom Uploadcare.
- It expects a
- In production, you should use a global PostgreSQL connection instead of creating a new one for each request. This is important for performance and resource management.
- Setup: It initializes the Neon database client and the Hono web framework. It relies on environment variables (
Testing the upload endpoint
Once your server (Node.js or Python example) is running, you can test the
/uploadendpoint to ensure files are correctly sent to Uploadcare and their metadata is stored in Neon.You'll need to send a
POSTrequest withmultipart/form-datacontaining a field namedfile.Open your terminal and run a command similar to this, replacing
/path/to/your/image.jpgwith the actual path to a file you want to upload:Bash curl -X POST http://localhost:3000/upload \ -F "file=@/path/to/your/image.jpg" \ -F "fileName=my-test-image.jpg"-X POST: Specifies the HTTP method.http://localhost:3000/upload: The URL of your running server's endpoint.-F "file=@/path/to/your/image.jpg": Specifies a form field namedfile. The@symbol tells cURL to read the content from the specified file path.-F "fileName=my-test-image.jpg": Sends an additional form fieldfileName.
Expected outcome:
You should receive a JSON response similar to: { "success": true, "fileUrl": "https://ucarecdn.com/xxxxxx-xxxxxx-xxxxx/" }You can now integrate calls to this
/uploadendpoint from various parts of your application (for example, web clients, mobile apps, backend services) to handle file uploads.Accessing file metadata and files
Storing metadata in Neon allows your application to easily retrieve references to the files uploaded to Uploadcare.
Query the
uploadcare_filestable from your application's backend when needed.Example SQL query:
Retrieve files for user 'user_123':
SQL SELECT id, -- Your database primary key file_id, -- Uploadcare UUID file_url, -- Uploadcare CDN URL user_id, -- The user associated with the file upload_timestamp FROM uploadcare_files WHERE user_id = 'user_123'; -- Use actual authenticated user IDUsing the data:
- The query returns rows containing the file metadata stored in Neon.
- The crucial piece of information is the
file_url. This is the direct link (CDN URL) to the file stored on Uploadcare. - You can use this
file_urlin your application (for example, in frontend<img>tags, API responses, download links) wherever you need to display or provide access to the file.
This pattern separates file storage and delivery (handled by Uploadcare) from structured metadata management (handled by Neon).
Resources
Section titled “Resources”Need help?
Section titled “Need help?”Join our Discord Server to ask questions or see what others are doing with Neon. For paid plan support options, see Support.